So you have done so many things with paper bags. You have stamped them, made puppets, wrote your kids names on them, added ribbon and tags. Have you ever just printed on them using your printer? The possibilities are endless...you can personalize them with your own photos, names, dates and anything you can think of. This would make inexpensive and great favor bags!! Plus paper bags come in all colors. Here is a really cute cowboy/sheriffs favor bag using the $ sign clip art.  (photo found on No Fuss Fabulous)
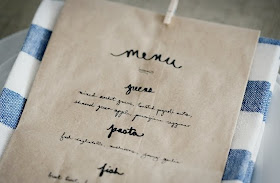
 Menu card for a casual affair.
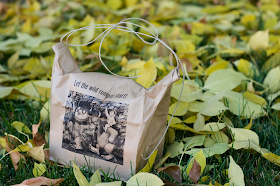
 Treat bag for movie outing by Sara Nielsen
1. Choose your favorite clip art pictures, web photos, or your own pics.
2. Meaure the height and width of a flat lunch bag - you'll be printing on the "top" side - where the bottom flap doesn't interfere with the print layout.
3. Use any word processing program like Microsoft Word to set up your document size to the height and width of the flat folded lunch bag dimensions. Allow for a margin on top, bottom, left and right - about an inch is good.
4. Add your Greetings and Pictures - Create a text or picture box centered on the lunch bag document front and insert your picture. It should automatically resize to the dimensions of the text box. If not, just scale it down to the size you want. You can add a border or background color, too, if you like.
5. Continue to insert text boxes above and/or below the picture to add each bit of greeting text, or your name - or more pictures, even a graphic border - whatever you like.
6. When you have a design you like, load a single bag into your printer's paper tray, taking care to position the flap of the folded bag so it will be on the underneath side when it comes through your printer.
7. Print your treat bags, 1 at a time!
 (photo found on No Fuss Fabulous)
 Menu card for a casual affair.
 Treat bag for movie outing by Sara Nielsen
Sorry I don't have any of my pics from the soooooo many times I have personalized paper bags. (I wish I had my own personal photographer!) I guess I will have to make some more and take pictures this time!! However, here is how you do it.
1. Choose your favorite clip art pictures, web photos, or your own pics.
2. Meaure the height and width of a flat lunch bag - you'll be printing on the "top" side - where the bottom flap doesn't interfere with the print layout.
3. Use any word processing program like Microsoft Word to set up your document size to the height and width of the flat folded lunch bag dimensions. Allow for a margin on top, bottom, left and right - about an inch is good.
4. Add your Greetings and Pictures - Create a text or picture box centered on the lunch bag document front and insert your picture. It should automatically resize to the dimensions of the text box. If not, just scale it down to the size you want. You can add a border or background color, too, if you like.
5. Continue to insert text boxes above and/or below the picture to add each bit of greeting text, or your name - or more pictures, even a graphic border - whatever you like.
6. When you have a design you like, load a single bag into your printer's paper tray, taking care to position the flap of the folded bag so it will be on the underneath side when it comes through your printer.
7. Print your treat bags, 1 at a time!
I hope you enjoy!

Love the cowboy/sheriff one! Just adorable!
ReplyDeleteTerri
I am so in awe at what you do here! WOW! I lvoe this idea. Being a nana of two granddaughters and a grandson I can tell you this little project will be done! Unreal what you can do with a lunch bag! Matter of fact we are celebrating my grandson's 4th birthday today. If I had of known about this before hand he would so have had these bags. Next granddaughter's birthday is April...yep, I see some bags on the table! TFS and have a blessed weekend. Cindy
ReplyDeleteLove the ideas! Thanks for the inspiration!
ReplyDeletelove the cowboy "loot" bag-too cute! For school field trips, I run my boys paper lunch bags through the printer-they love it!
ReplyDeleteLove this idea!!!! Perfect for my little man's cowboy party!
ReplyDelete